February 23, 2010

Design Wall-Monday or Not

The only thing on the design wall for now is the diamond log cabin. It's not that I don't have a few dozen other things to put up there. It's that I've had a few emails and some questions asking about the design wall itself. So, I thought I would share a few of the details and I left most of the space bare so I could take a few pictures.

The "design wall" is actually attached to a wall that separates two small bedrooms. I've been asked why we don't we just knock down this wall between the two rooms,  and make it one big sewing space. As it is now one room is the sewing machine  fabric stash room, the other adjoining room is the cutting-ironing- table room. However, if we took out the wall, then there wouldn't be a design wall space as the rooms are small with corner windows, and really not much wall area.

There are a few things I can be without in the Itsy-Bitsy sewing rooms, but the design wall is not one of them!

The design wall  is approx. 8' ft. wide x 6' ft. tall.  If I could have it twice that wide or more I would! If I could wrap it around the corners of the room and run it down the hallway, I would!  I truly feel you can never have too much design wall space.  So, if you are contemplating a design wall in your sewing nest. Make it as big as possible!  Height is not very  important as about 6 or so feet is about as tall or as high for you to comfortably reach anyway,  unless you stand on a step-stool.

This is my design wall space.


It is made from two 8' x 4' foot sheets of Homasote cut down to 6' feet in height. A type of paper based fiberboard. It is sold at Home Depot and Lowes or local building supply sources. It is rigid type material, but porus enough so that you  can stick straight pins into it easily.


 Making the wall:  After we determined the size I wanted the Homasote, both pieces were layed out over one large piece of Warm and Natural batting which was spread out on the floor and cut  4 inches wider all the way around both pieces of Homasate.  We butted up the two center edges of the Homosate, and ran a piece of packing tape down the seam to help keep it secure while we attached the batting.


Then we pulled the edges of the batting around over the back side of the Homasote and stapled down the edges with a staple gun every 5 inches or so on all the way around the back.

Next you need to determine where the studs are in the wall where you may want to attach the design wall,  as it will be screwed in place with dry wall screws with washers under the head of the screw to keep the screws from sinking into the Homosate as you secure it to the wall.

 
It will take two or three people to lift the design wall up against the area in your sewing space where you want to have the design wall. One person to hold it in place,  while the other person uses a drill to make the screw holes and secure it in place. Two sheets of Homasote covered with batting can be heavy and awkward to lift and move. The design wall appears to be one solid area, but it's two  4' x 6' pieces covered with batting.


My design wall has been in place for many years and had many quilt blocks and quilts placed onto the surface of the batting. Once in awhile I vacuum the stray threads off the batting. But that is all the upkeep it has needed.

Here is a picture of the progress on the diamond log cabin.

I finished adding the borders and piecing the backing on the bright tie-dye flannel quilt top, and it's hanging on the long arm waiting for some quilting design inspiration.


I hope the directions are helpful and that you also can find a space suitable for a design wall in your sewing space.


February 18, 2010

Bamboo Fun


It's interesting how Bamboo has become such a part of our daily lives. From the Bamboo forest in Thailand to the floors in our homes to batting in our quilts. That is just a few of the ways we use Bamboo.


This is Wacom's version of bamboo. The Bamboo Fun tablet. I'm not entirely sure what it has to do with Bamboo. However, it certainly is fun! It can free you from the paper and pencils we normally use to draw with, and open a new realm of possibilities for drawing, painting, digitizing and photo editing. My primary interest in learning to use a graphics tablet like the Bamboo Fun is to practice drawing quilting designs, and overlay those drawn designs onto photos of my quilts and to see how how the designs will look on the quilt block, or on the quilt sashing and borders.


The Bamboo rests near my computer and I practice drawing most days for about 30 mins. Here is some doodling of some meander. It's a bit of a challenge to get used to the how the pen draws and how to best control it. But, that is getting better with practice, and I'm learning about several things at once. How the Bamboo pen operates. How the photo editing program works, and how to draw quilt designs with the Bamboo pen.


I've been watching and practicing Lisa Calle's "Feathers of a New Generation" and drawing on this photo of one of the quilt tops from The Martha Quilts we completed.

I've had the Bamboo Fun for quite awhile, but only became interested in using it more after I took Carla Barrett's recent Quilt Whispering class online.

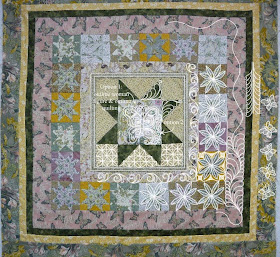
This is how Carla used her tablet to whisper a design on my quilt top! I love what she suggested as quilting designs. I just hope I can stitch the designs as well as she has drawn them out.


There are many types of graphics tablets. Some are more expensive than others, or offer additional features. So, if you think you want to try one, shop around. I found Amazon.com has a large selection of these tablets and it's interesting to read the reviews before you decide on which one suits your needs & budget.


February 15, 2010

Design Wall Monday

Well, I made it. Just barely under the wire---I'm actually going to post what's on the design wall before midnight!--on Monday. I finished the String Quilt top this past week and quilted it on the long arm. I've never attempted Dawn Ramirez Dwirling technique, and thought this would be a good quilt to test it out.


It took me about 4 hours and 9 bobbins of Perma Core thread. The quilt is 85" x 72" and it is heavy feeling, even though I have Legacy batting in it. Legacy 80/20 is not quite as thick feeling as Hobbs 80/20. Yet the quilting show up well.

This is the back.


Click here to see my Dwirling video.


I can see the appeal of Dwirling, especially for scrappy quilts like this one.


Even though it's not very noticible I did add more log cabin diamonds to the wall hanging. I've added a flannel tie dye quilt top to the design wall this week. It's a UFO that has been stored away for years. It's time to get it finished---- Jana, just put on your sunglasses! (grin)


February 14, 2010

Vintage Valentine Wish

Wishing all of you a Happy Valentine's Day!


(original vintage postcard dated Feb. 1911 from my collection)

February 11, 2010

Design Wall Monday

As usual I'm late. Does that count? If it does, I'll try to do better next Monday. OK, here is what has changed on the design wall.
I finished the String Quilt top I started and I'm piecing a backing for it now. I dislike making backings. I think when I'm done using all my large pieces of fabric for backings I'm going to stick to buying those huge one piece quilt backings! I have bought a few in the past, and they are great!


I did not even make a small dent in all the strips I have stored in the bins. So, yes, there are a lot more string quilts on the horizon. If I have peeked your interest in making a similar quilt, I must warn you that these types of quilts are totally addictive! Now, I'm looking forward to loading this string top on the long arm this weekend. It's colorful!

I am so interested in string quilts, and how they are made, and all the variations that I found this book on Amazon. "Strips & Strings" 16 sparkling quilts. by Evelyn Sloppy. It's all about scrappy quilts, and her need to use leftover fabrics that led Evelyn to write this very informative book. As quilters, I think we all recognize that need. I sure do after looking at my fabric stash!


I was so intent on finishing the string quilt top I sort of forgot about the Log Cabin Diamond wallhanging. I did about 5 little blocks just so I could mark some progress. Those dark ones up in the left corner. Not much, but any time I piece on this project, I consider it progress.


Later today I plan to blog about the" Bamboo"!

What's on your design wall?


February 06, 2010

Online Learning

I just finished my first online quilting class. It was such fun! I may never take a "real class" again! I didn't even have to get dressed! PJ's are so comfortable for studying.

I could do the class drawing assignments when ever I wanted. I didn't have to be anyplace at a certain time! This class was about drawing quilting designs on your quilt. Morning, noon or night I could draw for a few minutes, or for hours. I didn't have to load my supplies or my machine or whatever I may need into the car and drive anyplace! You might say "well you missed being with other quilters"----are you kidding! They were everywhere. From around the world literally! All chatting online and sharing pictures, and talking one on one with the quilt instructor and with each other. It was great! I've already signed up for another class.
Another wonderful online learning resource is QNN TV. You can join for a very reasonable price similar to the price of an annual magazine subscription. They also have many free videos. I'm learning about continuos curve quilting on a long arm with Linda Taylor on QNN. The neat thing about learning online is if you "don't get it" the first time, you can back up the video and watch it again. I plan to watch all of LInda's video series. Awesome!

There are hundreds of free tutorial on You Tube about quilting, and on some of the long arm and quilting websites, the teachers are showing how they do some of their techniques . Don't over look the generous Bloggers that are now sharing and teaching quilting online. It's a new way of learning. Roll call---I'll be there!


February 05, 2010

First Signs of Spring

I went walking around the property today and found the first signs that Spring is on the way.

Snowflake flowers. These are one of the first bulbs to bloom near the wall at the end of the house.


Flowering Quince bush outside the bedroom window.


Single petal Pink Camellia bush. It is loaded with beautiful flowers this season.


The first Daffodils!


These apricot Mini-Carnations. I think they are a bit confused. They don't usually bloom until much later.


This beautiful double petal rose colored Camellia blossom.

February 03, 2010

Quilt of Valor Finished

This is the latest Quilt of Valor #8 that I have completed on the long arm. This beautiful quilt top was made by a Shirley and her group of Snow Birds in Florida.


I used Carol Olson's 8" inch "Fine Line" Quilters Ruler to do the border and stitch around the stars. Love this ruler! Clear acrylic with etched marking guides and two velcro strips give it grip on the fabric. The two peg handles on the top make it easy to hold in place.